katie
REPLY
You've saved my job, life and most of all, sanity! Thank you!!!!
Here at Printmoz.com, we’re always asked questions (more than you can imagine!) on how to add bleed in Photoshop. It’s something even graphic designers don’t always understand. But when you learn the simple trick of how to add bleed in Photoshop — you’ll impress even the top designers in the world.
In this ultimate guide to creating a print-ready file, you’ll be like a graphic design pro. You’ll learn about standard 1/8 bleed size, how to set up photoshop crop marks, and how to add bleed for printing in Photoshop. You’ll also get the basics that will make your final printed designs look like they were made with magic (and it’s almost that simple!). So, let’s get started.
When you learn how to add bleed in Photoshop, you’ll quickly discover there isn’t a one size fits all when it comes to adding bleed in Photoshop. Photoshop is a little different than InDesign and Illustrator when it comes to having set standard bleed sizes set up already.
Before we dig into the entire design process of setting up your print ready file, we want to give you a specific definition of what a bleed is, and how it will help you get the finished product you’ve been wanting to create.
Bleed is a term used in the printing world. I’m going straight to Wikipedia for this definition.
Bleed is the area of a document that will be trimmed after it’s printed. It’s where there can be graphics or words going beyond the edge (and you may not know what that to happen!). When it comes to specifics in the printing world, you’ll want to make sure to have your files set up for the printer.
This is in the printing world bleed is important because printers don’t print all the way to the edge of a piece of paper or another substrate (vinyl, canvas or foam core are also substrates that can be printed on).
If a printing press printed all the way to the edge of a piece of paper, it would probably end up as a blobby mess. The ink could build up and get “stuck” on the side creating an unprofessional appearance. You may want to know how to add crop marks in Photoshop as well. We’ll get to that later.
Because first impressions matter. So to keep things looking brilliant and smooth, you’ll need to set the bleed lines correctly. In this article, we’re going to focus on how to add bleed in Photoshop only. That’s plenty to keep you busy for a few minutes.
If your document doesn’t have bleed margins set correctly, it can give you problems. It can leave a white border on any or all sides of the printed material, and it looks terrible! I made this mistake years ago when I ordered some business cards. I ended up throwing them in the trash and wasted too much money. Don’t let this to happen to you.
There are several Photoshop instructions on the web today, but in this tutorial, I’m using Photoshop CC 2017. There are subtle nuances to each Photoshop that may vary slightly. So if you have an older student version or haven’t updated your current version to the most up-to-date version, we suggest you do this before you follow this tutorial.
In here you can bring up building in 300dpi we can link later to "what is dpi in Photoshop."
Setting up your document, in the beginning, will help you keep from making these printing blunders. Don't waste your time and money. So you’ll want to start the project with the end goal in mind.
Do you want your design to have any ink going all the way to the edge? Do you want it to have a border, or not? The standard bleed size in most printing processes is ⅛ bleed or .125 inches. But make sure you check with your printer to get exact specifications. Magazines, books, or extra large projects can have a different standard bleed size than the usual.
Another thing to be aware of is you’ll want to set your piece to 300 dpi. DPI is also known as dots per inch. You can learn more about it in this in-depth article that will tell you all about it. Another thing to be aware of is printers like to have print-ready documents set to CMYK color mode as well. Converting any Pantone to CMYK files will ensure your colors are the closest to what you’ve imagined.
If you already have a document created, you’ll need to increase the canvas size. This allows for that extra bleed margin in Photoshop. For this example, we’ll start with creating a new document. Then show you step by step how to add bleed in Photoshop.
First launch Photoshop. Click “File” then “New.” Please note, if you are used to doing graphics for the web or other digital media, you’ll need to make a small change. Make sure to choose the “Print” option on the top menu.

“Then choose the size you want after the printing and cutting are finished. Choose CMKY color mode and 300 dpi. Now click “View,” then “Rulers” and make sure to also click “Snap” in the “View” menu. Now click the top ruler and drag a blue “Guide” to the top and bottom of your document. Then click the vertical ruler on the left and drag a guide to the left and right side of your document. The guides will “Snap” onto the edge automatically.
Make sure to have your Adobe Creative Cloud updated first here
Download, then when prompted, click install, download file, then follow the installer instructions. Then, sign in with your Adobe ID
Download Bleed & Safe Guidelines Action Set For Photoshop here
With Photoshop open, go to your “downloads” file then click “printingpressguides.atn and click on it. Then go to Photoshop click “Window” then “Actions.”
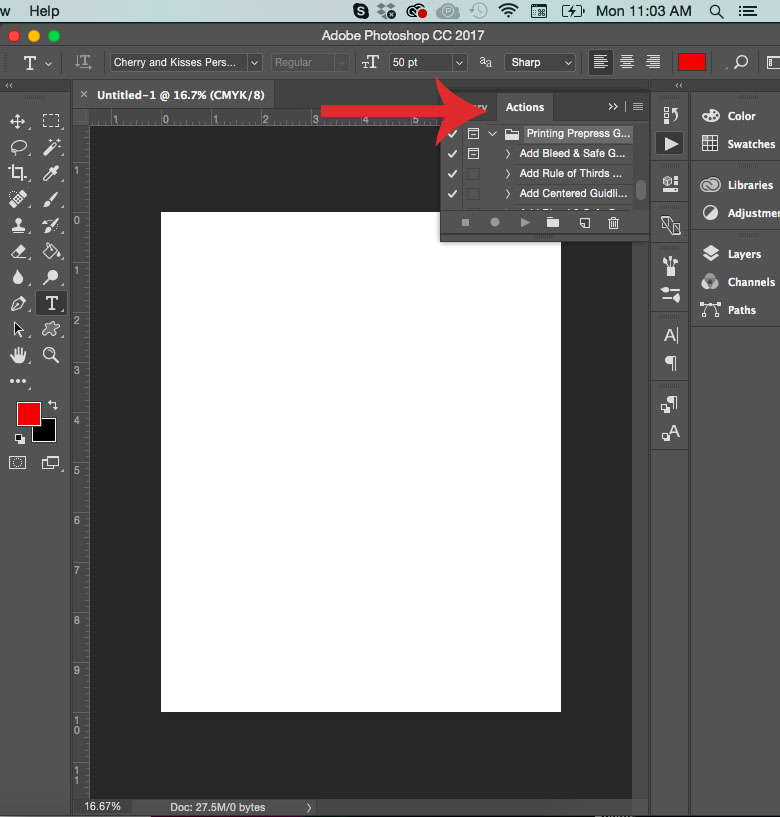
Click “Add bleed. Then safe guides (blank art). After that go to the bottom of that screen and click the “play” or arrow button. Check out the screenshot. Follow Step 1 then Step 2. This will automatically insert the standard bleed size of ⅛ bleed or .125 inches around every side. Keep all the elements you want to keep in your design inside the turquoise guidelines. You’ll be left with the perfect instructions for your project.

Now for the fun part of creating your print-ready document. You have a solid foundation with the standard bleed size set already. This will make your job much easier so your design will look like you want it to. Remember, the printed piece will be trimmed at the guidelines. In this case, it will be trimmed to 8” x 10” with an ⅛ bleed. Any graphic elements overlapping the guide will be cut accordingly. So make sure to keep elements within the guidelines.
On the flip side, if you want any graphics to go to the way to the edge of your document, create your design a little differently. Set up graphics past the bleed line if you want it to go all the way to the edge.
Now create your print-ready document. It has done-for-you add bleed with Photoshop action tool. Now you can use shapes, choose cool fonts, and branding for your business.

You can see in the photo overlaps the guidelines because I want that part of the design to go all the way to 3 edges. However, I want all the letters to be fully seen. This is what that design will look like after it gets back from the printer.

The way we set up the file previously is all your printer will need for crop marks. However, there is an alternative way you might like to set up crop marks. Both ways work great.
Make a new file in Photoshop. File> New>. Make it 8” x 10” and resolution 300 and CMYK color.
Now grab the ruler at the top and drag to the top and bottom of your document. Now do the same for the left ruler for the left and right side. Then click Image> Canvas Size> add .25 to the width box and .25 ot the height box for the extra bleed margin. Make sure the relative box is checked. Click OK. It will look like this:

File> Place embedded and select your poster. Click to place the file where you want it to go. Now the layout is looking good. You can now create the crop marks. Create a new layer, name it Crop marks. You can find it on the shapes palette. Hold the shift key while you click and drag. It will create lines directly on the guides. Do this for all four sides. Make sure the fill is black and there is no stroke. It will look like this now:

For the next step create a new layer and select the rectangle tool in the shapes palette. Make sure the background is set to white fill. Before you make your rectangle go to View and make sure the Snap to is not checked.
Now drag the rectangle to cover up all the lines you just created just outside of the guides. Now drag the poster layer to put it on the top of the other layers. Click View> Clear Guides. Now save your file.
You can now use the Rectangle marquee tool to set Photoshop crop marks on this poster. First, create a new layer and then hold down the shift key, create a box on the inner guide of each corner, then use the paint bucket tool to fill in each selected rectangle or square with black chosen from the color guide. This is the final poster with Photoshop crop marks. You may have to zoom in to see the corners.

First, open your PDF > Create a new layer. Fill it with a bold color (I used orange). Drag it in the layer panel to the top. I also typed in the word bleed in a new layer just to have something to show you. Now click Image > Canvas Size > Check relative put in .25 in Width and .25 in Height > Click OK.
Now drag the orange color layer behind your other layer. You’ll be able to see the orange bleed around the entire edge of your document now. Now we’ll want to color the bleed document with the same color the original document already had.
Select the orange fill layer. Grap the rectangular marquee tool > Select the area you want to fill with your original color. My document has 2 colors so I’ll need to follow this process twice for each color. Pick the appropriate color in front > Paintbucket tool > Place arrow on an orange border to fill this ensures that your printer won’t print an orange border around your document. to add crop marks in photoshop cc 2017.
There are several Photoshop instructions on the web today, but in this tutorial, I’m using Photoshop CC 2017. There are subtle nuances to each Photoshop that may vary slightly. So if you have an older student version or haven’t updated your current version to the most up-to-date version, we suggest you do this before you follow this tutorial.
After you’ve created your poster, banner or picture to get printed, you know how to add crop marks in Photoshop or using the added crop marks with the incredible free action tool, or by using the rulers and guides. Now you’re ready to click, File, save as you’ll be ready to submit to the printer.
To make you look like a real pro, you can even save your file name like this Your name > project name > material > size.
This is an example of an easy to use way to save your file:
DinaColada-NewYearsPoster-gatorboard-8x10
This will make it easy for you and the printer to find your documents quickly and easily!
You've saved my job, life and most of all, sanity! Thank you!!!!
I downloaded this action and used it on some cards I was trying to get printed, but my margins were set for .25 instead of .125 which is 1/4 instead of 1/8. Is there a way to change that?
Leave A Reply Cancel Reply